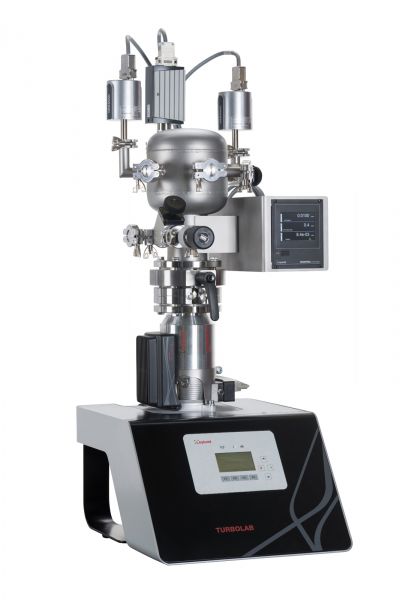
Calibration system CS3 Standard
| Part number: | 504768V001 |
| Calibration ports: | 3 x DN 16 ISO-KF |
| Calibration range: | 1.000 - 1 x 10⁻³ mbar 750 - 0,75 x 10⁻³ Torr |
| Dimension W/D/H: | 405 mm / 465 mm / 900 mm |
| Gas inlet (manual): | 5 × 10⁻⁶ - 1.000 mbar × l/s |
| Power supply: | 110 V / 230 V, ± 10% (50/60 Hz) |
| Pressure measurement range: | 1.000 - 2 x 10⁻⁶ mbar 750 - 1,5 x 10⁻⁶ Torr |
| Weight approx.: | 37 kg (incl. gauges) |
Calibration system CS3 Standard
CS3 Standard with DAkkS-Calibration
Compact calibration system for checking and recalibrating of vacuum gauges in the range of 1.000 to 1 x 10⁻³ mbar.
The base unit of the CS3 Standard is mainly comprising a stainless steel calibration chamber (design in accordance with DIN 28 418 respectively ISO/DIS 3567/68). Supplied with three calibration ports, a dry-compressing Turbo-molecular pump system TURBOLAB 90, a manual gas inlet complete with dosing valve and a high-vacuum butterfly valve for throttling the suction speed, respectively for isolating the pump system. A full range IONIVAC ITR90 gauge is fitted to display the complete pressure range of the sensors to calibrate as well as the systems ultimate pressure.
In addition, the base unit comes with two reference pressure transmitters CERAVAC CTR100N (1 x 1Torr, 1 x 1000Torr), a display device GRAPHIX THREE and the corresponding connection cables. All together they are calibrated in line with latest DAkkS-regulations.
Calibration at low pressures (10-3 bis 2 × 10⁻¹ mbar-range) can be conducted in dynamic mode, meaning that the inlet gas quantity is manually balanced with the pumped gas flow. At higher pressures (up to atmospheric pressure), the calibration has to be carried-out in static mode, meaning that the calibration chamber is isolated from the pump system and gas is admitted until the desired pressure value is reached. Static calibration requires a low outgassing rate, which is achieved by a clean calibration chamber and an extensive pumping time.
Further variants of the CS3, e.g. with different reference pressure ranges or with a rotary vane pump for dynamic calibration across the entire pressure range, can be offered upon request.
Advantages to the User
- Vacuum gauges and measurement systems of any make may be calibrated
- Designed in accordance with DIN 28 418 resp . ISO/DIS 3567
- Transfer standards with PTB-, DAkkS- or factory certificate
- Easier DIN/ISO 9000 approval
- Reliable and reproducible measurements
- Quick start-up
- Measurement system free of hydrocarbons through the utilisation of dry compressing vacuum pumps
- Simple operation
- CE approval


